PC-Mac PasswordVault
User Manual
HTML Edition:
3.1.0.0
Release date: 11 June 2004
Notices
Operation
Introduction
Security considerations
Choosing a master password
Setting up master password
recovery
Entering your master password
Controls on the main window
Adding a new service
Editing a service
Removing a service
Exporting service data
Importing service data
Accessing service information
Selecting a background skin
Resizing the main window
Positioning the main window
Backing up your
service data
PC-Mac PasswordVault2Go special features
Using
PC-Mac PasswordVault in large organizations
Advanced techniques
Appendices
Operation
Introduction
This application securely stores your collection of important service
access information such as website usernames and passwords, Internet
banking account numbers and PINs, and software registration details for
quick and convenient access.
- Perfect for home, school and office use
- One-click access to usernames, passwords and
websites
- Protects your data using very strong
896-bit double-Blowfish encryption
- Allows you to access all your data by entering
a simple 'Master Password'
- Master Password Recovery System (MPRS) ensures
you never lose your data
- You can safely change your master password
regularly, due to the MPRS
- PC-Mac PasswordVault2Go runs directly on portable
media like USB drives
- Organizations can securely distribute password
collections to users via email
- An auto-lock timer protects your data if you
leave your desktop unattended
- Service categories can be added, changed and
removed at any time
- The random password generator can create very
secure random passwords
- Service data can be easily and securely backed up
as an encrypted data file
- Imports and exports service data in several clear
text and encrypted formats
- Encrypted service data files can be saved to and
loaded from any location
- Notes can be included with a service, for
storing email addresses, etc.
- Main service information access window takes up
very little screen space
- A dynamic help system provides information
about the function of each button
- A variety of attractive 'skins' can be selected
for the main window backdrop
- Windows 98/NT/2000/ME/XP, MacOS
X, MacOS
Classic and Linux versions
- Compatible to MacOS from System 8.1 to MacOS X
10.3 (Panther)
PC-Mac PasswordVault is the desktop
version of the software, and is installed in the same way as any other
application on your desktop or laptop computer. You launch it in the
same way as any other desktop
program.
PC-Mac PasswordVault2Go is the portable version of the software,
and is installed by copying the
'PC-Mac PasswordVault2Go' folder onto your USB drive or other portable
media (eg. iPod, Zip disk, etc). USB drives are also called USB
memory sticks, JetFlash, USB flash drives, flash memory sticks, etc. You launch it by
double-clicking the program icon on your USB drive. See the installation notes for further details.
When you purchase, you get download access to both versions of the
software for all computer platforms.
|
"I did a lot research in
selecting a password program and thought yours was REALLY good. I
especially like the memory stick feature."
-- A. Turley, ME, USA
"Thanks for an excellent
product."
-- K. Focht, NV, USA
"This is a great little
tool."
-- B. Wesson, CA, USA
"This is what I have been
waiting for!! I hate Gator!"
-- C. A. Saunders, NH, USA
"I love the Mac and I love your
utility."
-- D. Barsocchini, CA, USA |
Security considerations
PC-Mac PasswordVault was designed from the ground up with security
in mind. All your information is protected by highly secure 896-bit
double-Blowfish
encryption, and the only time this information is in a form which can
be
easily accessed is when you are running PC-Mac PasswordVault. Even
if a hacker manages to access the data file which stores your
information, it cannot be read without knowing the master password or
by using
the master password recovery system.
Choosing a
master password
When you launch PC-Mac PasswordVault for the first time, an empty Master Password Preferences dialog
will be displayed. This dialog is shown below in Figure 1, containing a sample master
password and some sample master password recovery clues.

Figure
1. The Master
Password Preferences dialog
The first step is
to choose and enter a master
password. Your choice of a good master password is important in
ensuring the
security of
your data. With PC-Mac PasswordVault, the master password is the only
password you need to remember, so it is a good idea to make it
reasonably long and include some numbers. For example, 'yukonmoose597'
is a good master password since it combines two unusual words and
includes numbers as well.
Setting
up master password
recovery
'Master Password Recovery' is a powerful and unique feature of PC-Mac
PasswordVault, which allows you to
recover elegantly if you ever forget your master password. Forgetting a
master password is relatively easy to do. This can occur, for example,
if you go for a holiday and don't use your master password for a few
weeks. Maybe you chose a particularly complex master password and one
day you accidently transpose two numbers in the password. Without the
master password recovery system built into PC-Mac PasswordVault, you
would have lost you data forever!!!
The master password
recovery system works by allowing you to enter a series of personal
questions (ie. clues), to which only you know the answers. Any number
of
clues can be used, so you can make the recovery system at least as
secure as the master password itself - the more clues used, the better
the security. You should use clues which have very exact, explicit
answers, which will never change. For example, 'What was my puppy's
name
when I was 6?' is a good clue, because it is something you will
probably
never forget and which very few people would know. An example of a poor
clue is, 'Who is my best friend?'. The answer may change over time,
thus affecting successful recovery (ie. you may enter what you think is
the correct answer, but it may not be what you originally entered).
Setting up master password recovery is easy and is strongly recommended
for all users - if you forget your master password and do not have
master password recovery set up, you have permanently lost the data
stored inside PC-Mac PasswordVault! On the other hand, if you have set
up master password recovery, you just need to answer some simple
questions to get back to the main screen. From there, you can
re-familiarize yourself with your master password or change it to
something else.
To add a new clue,
enter the question in the Question
textbox and the answer in the Answer textbox.
Then press the Add Clue button
to add it to the list.
To update a clue,
select it in the list and it will be placed in the top textboxes. Make
any
changes you wish and then press the Update
Clue button to update the clue in the
list. Then press the Save
button to save the list of
clues.
To remove a
clue,
select it in the list and press the Remove
Clue
button.
After you have
added all the clues you want to
add, press the Save button to
save the list of clues. To display the Master
Password Preferences dialog again, press the Keys button on the main window (see Figure
2 below).
Controls on the main window
The expanded form
of the main window (shown below in Figure
2) gives you access to all controls. It is
like a window from any other typical application, so will move into the
background if another application's window is brought forward.
Help
information
about a particular control
(buttons, popup menus, etc.) will be displayed when you move the mouse
cursor over it, so it's a
good idea to see what various controls do by reading their help
information. This is a quick way to become familar with the basic
functions of PC-Mac PasswordVault. For
example, on the top right side are the add, edit and remove service
buttons, which allow you to manage your service information.
Note: On the Linux version,
the button to display the user manual is not available. To read the
user manual, please open the 'User_Manual' folder and double-click the
'contents.html' file.

Figure
2. The expanded form
of the main window
Use the Expand
And Contract
button (the
sideways arrow in the top middle of the window) to minimize
and
maximize the main window in place (ie. without moving it).
The
contracted form of the main window (shown below in Figure 3,
containing a sample 'Hotmail' service) is a great way to make
your information easily accessible for
any application whilst using the absolute minimum amount of screen
area. It floats above all windows of all applications on the screen (on
all platform versions, except on MacOS Classic).

Figure 3. The contracted form of the
main window
Adding a new
service
A service is simply
a username, password, web address and other information linked to a
service name. For example, you might add a service to PC-Mac
PasswordVault called 'Hotmail', with a username of 'mpotter', a
password of 'grootburger' and a web address of 'www.hotmail.com'.
To add a new
service, press the green Plus button
on the
main window to display the Add Service
dialog (shown below in Figure 4).
Enter the service name, select the service category from the popup menu
(or enter a new category name),
enter the username, password and web address (if applicable). You
can also add additional notes, if required. You can change the type of
service using the 'Username' and 'Password' title popup menus. For
example, if you are entering Internet banking information, you might
select 'Account No' and 'PIN' from these title popup menus.
When the
information is complete, press the Save
button
to save the information - the service will now be added to the service
selection popup menu on the main window, and the Add Service dialog will be cleared
(ready for you to enter information for a new service). This automatic
clearing after saving makes it easier and faster to enter a list of
services.
To return to the
main window, press the Cancel button.

Figure 4. The Add Service dialog
Editing a
service
To edit an existing service, first select it from the service selection
popup menu on the main window. Then press the orange Asterix button to display the Edit Service dialog (shown below in Figure 5). Make any necessary
changes and then press the Update button.
You will be returned to the main window immediately.

Figure 5. The Edit Service dialog
Every time you
update service information (ie. using the Edit Service dialog), such as
changing the password or adding a
web address, a time/date stamp is made on the service data. If you
subsequently import this newer service data on another computer, it
will replace any existing older service data stored under the same
service name. In this way, you can
easily synchronize the service data on a number of computers. This is
especially useful on a home or office network.
Removing a
service
To remove an existing service, first select it from the service
selection popup menu on the main window. Then press the red Cross button to remove it. The Remove Service Confirmation alert
shown in Figure 6 below will
be
displayed. Confirm the removal and the service will be deleted from
the service selection popup menu.
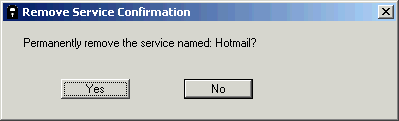
Figure 6. The Remove Service Confirmation alert
Note: If you are using PC-Mac
PasswordVault on your desktop computer and PC-Mac
PasswordVault2Go on a USB drive and have Auto-Sync To Desktop enabled on
PC-Mac
PasswordVault2Go, remove the service when running PC-Mac
PasswordVault2Go first and then remove the service when running PC-Mac
PasswordVault. Otherwise, the removed service will be copied back
automatically next time you launch PC-Mac
PasswordVault2Go. Alternatively, you should disable Auto-Sync To Desktop on PC-Mac
PasswordVault2Go.
Accessing
service information
Select a category from the service category popup menu (on the top left
side of the main
window - see Figure 7 below)
to see a list of services (sorted alphabetically) in this category.
Then select the service from the service selection popup menu at the
top centre of the window.
The
username, password and notes for this service will be displayed on
the main window.
If you want all
services to be listed in the service selection popup menu, select 'All'
from the service category popup menu.

Figure 7. The main window with a
service selected and displayed
If there is a web
address set for this service, you can press the Go To Web Address button (on the top
left side) and your
web browser will immediately load in the correct web page from the
Internet. If no web address is set, this button will not be visible.
You can either
press the Copy Username To Clipboard
button or
Copy Password to Clipboard
button to
copy the respective information into the clipboard, ready to paste in
where required on the web page, or manually type in the username and
password where required for the service (ie. in textboxes on a web page
requesting your username and password).
You can also copy
text into the clipboard from the additional notes area, if required.
General
Preferences
The General Preference dialog (see Figure
8 below) is displayed when you select 'Preferences...' from the
menu or press the General Preferences
button on the main window.

Figure 8. The General Prefences dialog
Skins are used for the backdrop of the main window, allowing you to
personalize PC-Mac PasswordVault to your taste. To choose a skin,
simply
select it the Skin popup menu
- the main window backdrop will update immediately with the new skin.
Check the Master Passwords checkbox to have
passwords on the main window replaced by asterixes. This prevents
others from seeing your passwords if you have the main window expanded.
The auto-lock time
is the time (in seconds) from the last activity before the automatic
lock is activated, and can be set by entering a number between 20 and
1800 (ie. 1800 seconds = 30 minutes) in the textbox. Enter '0' to
disable the auto-lock function. You
can also lock PC-Mac PasswordVault manually by pressing the Lock button on the main window.
To rename a service
category, select it from the popup menu and it's name will be
entered in the textbox. Change the category name in the textbox and
then press
the Rename button to rename
the category to the new name entered.
Positioning
the main window
It is recommended that the main PC-Mac PasswordVault be contracted and
placed on the top right-hand-side of the screen. In this way, you can
easily access the service selection popup menu as well as the
copy-to-clipboard buttons, whilst requiring very little screen area.
Entering
your master password
When you
launch PC-Mac
PasswordVault (and have set a master password), you will see the dialog
in Figure 9 displayed. If
master
password recovery has been set up, the Recovery
button
(the Key) will also be
visible. If
the Recovery button is
not visible, it means that master password recovery has not been
set up and is not available.

Figure 9. The Enter Master Password dialog
Enter your master
password and press the Enter button
to display the main PC-Mac PasswordVault window. If you get the master
password wrong, you can try again. If you have forgotten your master
password, press the Recovery
button to begin master password
recovery. The dialog shown in Figure
10
will then be displayed.
Figure 10. The Recover Master Password dialog
Simply enter the
answer to each question in the Answer
textbox
and press the Next >>
button. After you have worked through the series of questions and
answers, the main window will be displayed. If you can't remember the
answer to a particular question, think about it for a while before
trying again. If you cannot remember either the master password or the
answers to the questions for master password recovery, you cannot
access
the service information stored inside PC-Mac PasswordVault.
If you can't
recover, you should quit PC-Mac PasswordVault and move the 'Prefs.txt'
file (in the PC-Mac PasswordVault preferences folder - see the FAQ) to a safe place on your hard disk (such
as a backup folder) and then run PC-Mac PasswordVault again. Your
master
password will now be cleared, in addition to your previous service
information. The 'Prefs.txt' file contains your master password,
master password recovery information and service data.
If you have
previously backed up your service data using the export function in
PC-Mac PasswordVault (possibly in PV
tab-text file
format, a clear text format without a master password), you can import
this data file and your service
data will be recovered.
Exporting
service data
To export your
service data, press the Export
button
on the main window or select 'Export...' from the File
menu, and
the Export
dialog
will be displayed (see Figure
11
below). Use the File
Format
popup menu to select the
format of the file you want to export. You can export data in either
encrypted PV data format, or in several clear
(unencrypted) tab-text formats (ie. tab characters delimit the various
fields in each service record).

Figure 11. The Export dialog (PV data file format)
When exporting in PC-Mac PasswordVault (PV data)
format, the exported file is encrypted and is thus safe to store
anywhere. You can choose which categories you want to include in the
exported file, and you can also change the master password stored with
the data. If the master password you include is different to your
normal master password, your master password recovery clues will be
excluded from the exported file. See Using
PC-Mac PasswordVault in large organizations for further information
about using this feature.
When exporting in PC-Mac PasswordVault (tab-text)
format (see Figure 12 below),
the service data is exported in clear tab-text format with the field
order displayed in the Fields Included
listbox. This file format is compatible to version 2.x of PC-Mac
PasswordVault and is basically provided for legacy compatibility to the
older version. It is recommended that you use the PV data file format described above,
as it provides protection from hackers via its strong encryption.

Figure 12. The Export dialog (PV tab-text file
format)
When exporting in PC-Mac PasswordWallet (tab-text)
format (see Figure 13 below),
the service data is exported in clear tab-text format with the field
order displayed in the Fields Included
listbox. This file format is compatible to 'PasswordWallet', a program
available to users of MacOS.

Figure 13. The Export dialog (PW tab-text file
format)
When exporting in Printable (text file)
format (see Figure 14 below),
the service data is exported in a clear text format with the field
order displayed in the Fields Included
listbox. This text file can then be printed off on your printer and
filed as a hardcopy reference of your password information.

Figure 14. The Export dialog (Printable tab-text
file format)
When exporting in Custom (tab-text) format (see Figure 15 below), you can select
which fields to include in the exported file, as well as the order of
the fields. This allows you to export your data in any format you like.
This option is for advanced users only.

Figure 15. The Export dialog (Custom tab-text
format)
Note: Please keep in mind that
files exported in tab-text format are unencrypted, and they should be
deleted immediately after you have backed up the text file,
printed out your service data (by opening the text file in a word
processor and then subsequently printing it), or transferred and
imported the text file to another computer. This will ensure maximum
protection of your service data from hackers.
Importing service data
To import a service data file, press the Import button on the main window or
select 'Import...' from the File menu.
The dialog shown in Figure 16
below will be displayed. Use the File
Format popup menu to select the
format of the file you want to import. You can import data in either
encrypted PV data format, or in several clear
(unencrypted) tab-text formats (ie. tab characters delimit the various
fields in each service record).

Figure 16. The Import dialog (PV data file format)
When importing in PC-Mac PasswordVault (PV data)
format, enter the master password of the file you wish to import and
then press the Import button
to select the file to be imported.
If the master password you entered matches the master password in
the file, the data will be imported and a message will be displayed
showing how many services were updated and added.
When importing in PC-Mac PasswordVault (tab-text)
format (see Figure 17 below),
the service data is imported in clear tab-text format with the field
order displayed in the Fields Included
listbox. This file format is compatible to version 2.x of PC-Mac
PasswordVault and is basically provided for legacy compatibility to the
older version. It is recommended that you use the PV data file format described above,
as it provides protection from hackers via its strong encryption.
Figure 17. The Import dialog (PV
tab-text file
format)
When importing in PC-Mac PasswordWallet (tab-text)
format (see Figure 18 below),
the service data is imported in clear tab-text format with the field
order displayed in the Fields Included
listbox. This file format is compatible to 'PasswordWallet', a program
available to users of MacOS.

Figure 18. The Import dialog (PW tab-text file
format)
When exporting in Custom (tab-text) format (see Figure 19 below), you can select
which fields to include in the imported file, as well as the order of
the fields. This allows you to import your data in any format you like.
This option is for advanced users only.

Figure
19. The Import
dialog
(Custom tab-text
format)
Backing up your
service data
It is strongly
recommended that
you backup your service data regularly (at least once per week). Do
this by pressing the Export button on the main window to
display the Export dialog,
selecting PC-Mac PasswordVault (PV
data) from the popup menu and pressing the Export button. You can save this
file onto backup media such as zip disk, burnable
CD, a
networked hard disk, or other
storage. Avoid floppy disks, unless you are desperate - they have very
limited capacity and are unreliable.
PC-Mac PasswordVault2Go special features
This special portable version of PC-Mac PasswordVault is designed to run
on USB drives, Zip drives,
iPods, etc. For example, university students can use PC-Mac
PasswordVault2Go to store their password
collections securely on a USB drive and plug it
into whichever computer they are given access to at their university.
Data is always secure, since it is protected by very strong 896-bit
double-Blowfish encryption.
World travellers can use PC-Mac
PasswordVault2Go to securely carry their
Internet password collections with them on their journey, accessing the
Internet at any Internet cafe, and even backup their service data files
by emailing it to themselves using any web-based email system (eg.
Yahoo, Hotmail, etc).
Data is always secure, since it is protected by very strong 896-bit
double-Blowfish encryption.
The preferences of
PC-Mac PasswordVault2Go are stored in the 'Prefs.txt' file
in the 'Data' folder inside the PC-Mac PasswordVault2Go folder, so they
move along with the application itself. It's a very good idea to
backup your data regularly, to prevent the loss of this critical file -
see Backing up your
service data for more information.
Alternatively, you can auto-sync your service data by installing and
using the desktop version of PC-Mac PasswordVault.
See Auto-synchronizing
service data
for further details.
Installation
The
'pc-mac_passwordvault2go.zip' archive contains the 'PC-Mac
PasswordVault2Go' folder. During the
installation procedure outlined below, this folder will be copied onto
your USB drive or other portable
media (eg. iPod, Zip disk, etc). USB drives are also called USB
memory sticks, JetFlash, USB flash drives, flash memory sticks, etc.
Note: It is recommended that
you format your USB drive in FAT32 format on Windows so that it is
compatible to the Windows, MacOS and Linux platforms.
To install PC-Mac
PasswordVault2Go under Windows, open the 'pc-mac_passwordvault2go.zip'
archive using Winzip (available from www.winzip.com), press the 'Extract'
button and select your USB drive as the destination. The
MacOS X and MacOS Classic versions of the PC-Mac
PasswordVault2Go program will remain
in MacBinary format (denoted with the '.bin' extension), and can be
converted from MacBinary on a Macintosh computer using StuffIt Expander
(available from www.aladdinsys.com).
To install PC-Mac
PasswordVault2Go under MacOS X or MacOS Classic, drag and drop the 'pc-mac_passwordvault2go.zip'
archive onto StuffIt Expander (available from www.aladdinsys.com).
Then copy the resulting 'PC-Mac PasswordVault2Go' folder onto your USB
drive.
To install PC-Mac
PasswordVault2Go Lite under Linux, open the
'pc-mac_passwordvault2golite.zip' archive (with 'File Roller' or
equivalent) and extract the folder to your USB drive (on Red Hat Linux,
you can simply double-click a zip archive and 'File Roller' will open
the archive). The 'PC-Mac_PasswordVault_Lin'
application must then
be set as 'Executable'.
All platform versions are included in the
'pc-mac_passwordvault2golite.zip' archive, so when you look at the
files under Windows, you may see a number of special Macintosh files
(the MacOS applications, some files with dot prefixes, etc). On MacOS,
you will see the Macintosh applications, as well as the Windows '.exe'
file. On Linux, you will see all the Windows and Macintosh applications.
To reduce the space used by PC-Mac PasswordVault2Go on your USB drive,
you can delete one or all of the following items:
1) Delete the 'User_Manual' folder (however, you then won't be able to
display
and read the user manual)
2) Delete the executable program files for platforms you don't need (you then won't be
able to use PC-Mac
PasswordVault2Go on all platforms) eg. if you only
need to run on Windows, remove all files and folders except
'PC-Mac_PasswordVault2Go.exe' and the 'Data' folder.
Running PC-Mac
PasswordVault2Go
Launch PC-Mac
PasswordVault2Go by
double-clicking the correct program icon for your operating system on
the USB drive. On Windows, the program is called 'PC-Mac_PasswordVault2Go.exe'.
On MacOS X, the program is called 'PC-Mac
PasswordVault2Go X'. On MacOS Classic, the program is called 'PC-Mac
PasswordVault2Go'. On Linux, the program is called 'PC-Mac_PasswordVault2Go_Lin'.
Special notes for Linux users:
A) The 'PC-Mac_PasswordVault2Go_Lin'
application must be
set as 'Executable'. You can do this in Red Hat Linux by right-clicking
the application, selecting 'Properties' and checking the 'Execute'
checkbox in the 'Permissions' panel.
B) If you are simply double-clicking the application to run it, make
sure the path and application name do not have any spaces in it. Spaces
in the file path may prevent it from running correctly.
C) If you haven't mounted your USB drive before, the following
information should assist you (though some specific instructions may be
different for your particular distribution of Linux and how your hard
disks are configured). In newer versions of
some Linux
distributions, some of these steps may be automated.
- Log
in as 'root'.
- Create a directory
called 'usbhd' in the 'mnt'
directory by entering 'mkdir /mnt/usbhd' in the terminal.
- Insert
your USB flash drive and enter 'mount -t auto /dev/sda /mnt/usbhd' in
the terminal. This should mount your USB flash drive and make it
available for use - the files on the USB drive can be found at '/mnt/usbhd'.
- Run the 'PC-Mac_PasswordVault2Go_Lin'
application.
- To unmount your USB
drive after quitting 'PC-Mac_PasswordVault2Go_Lin', enter 'umount
/mnt/usbhd' in the terminal. Then you should be able to safely remove
your USB drive.
- For information about
mounted disks, enter 'fdisk -l' in the terminal.
- For information about
your system in general, enter 'dmesg' in the terminal.
- Some useful
additional information is available at http://ldots.org/prodrive/
When you run PC-Mac
PasswordVault2Go for the first time and a desktop installation of PC-Mac PasswordVault
is detected, the Desktop Installation
Detected dialog will be displayed (shown in Figure 20 below). If you enter the
correct master password for the desktop installation, your preferences
will be copied across to PC-Mac PasswordVault2Go.
 Figure 20. The Desktop Installation Detected dialog
Auto-synchronizing
service
data
You can also choose
to auto-sync to the desktop installation when you launch PC-Mac
PasswordVault2Go by
checking the Auto-Sync To Desktop
checkbox. This checkbox is replicated in the General Preferences dialog of the PC-Mac
PasswordVault2Go version (see Figure 21 below). The portable and
desktop versions of PC-Mac
PasswordVault are automatically
synchronized when PC-Mac
PasswordVault2Go is launched, if the Auto-Sync to Desktop checkbox is
checked and the master
passwords of both versions match.
The auto-synchronization function also gives you a
very convenient way to synchronize data across multiple computers,
simply by plugging a USB drive containing PC-Mac
PasswordVault2Go into each machine in
turn and then running it. For example, many
users have a laptop computer and a home desktop computer and can now
keep password collections on both machines synchronized easily using a
USB drive.

Figure 21. The General
Preferences
dialog (2Go)
The
auto-synchronization function also provides the benefit of
automatically backing up your service data by
storing copies of it on a portable medium (such as a USB drive) as well
as your desktop computer. If either store
gets corrupted or lost, you can always obtain a copy of the data from
the backup.
Limitations
of this version
PC-Mac
PasswordVault2Go supports only a subset of the import and export
functions of the desktop version. The buttons on the main window used
for importing and exporting are not available, and you need to import
and export by selecting menu items on the File menu. Only the PC-Mac PasswordVault (PV data)
encrypted file format is supported on PC-Mac
PasswordVault2Go.
To minimize the
storage space required on your USB drive, PC-Mac
PasswordVault2Go does not include additional skins. It contains only
the default 'Brushed Platinum' skin.
Using
PC-Mac PasswordVault in large organizations
There are a number of
techniques which can assist you in getting the most from a site license
of PC-Mac PasswordVault in your organization.
Distributing
the PC-Mac
PasswordVault software to your
users
Site licensees can distribute PC-Mac PasswordVault
by placing it on internal file servers for internal access within the
organization, or including it on a user CDROM. For example, many
universities now provide both new and returning students with a CDROM
(usually when they enrol) which contains a range of useful software.
This CDROM
is designed to assist them in getting the most from their use of campus
IT facilities.
The terms for
software distribution of the Standard Edition under a site license:
PC-Mac PasswordVault2Go
(the portable version) can be distributed to all users for operation on
portable media, such as USB drives, iPods, Zip disks, etc. For example,
at a university, students and staff might use PC-Mac
PasswordVault2Go on USB drives, and obtain it by downloading it from an
internal university server accessible to both students and staff.
PC-Mac PasswordVault (the
desktop version) can be used only on computers which are owned or
operated by the organization which has purchased the site license. For
example, at a university, staff can use PC-Mac PasswordVault
on their university desktop and laptop computers, and might obtain it
by downloading it from an internal university server accessible only to
staff. Students
would be required to purchase a Standard Edition license to use it on
their own laptops and home computers, etc., or they could use the free
Lite Edition without restriction.
Distributing and
updating organization-specific password collections
The best approach is
for the administrator of the password collection to create a unique
service category and then add/update service data (username/passwords)
to this category using a unique service name prefix.
For example, the
administrator at a university might create a category called 'Admin - Faculty of
Arts' and then use the 'FOA-' prefix for all services included in this
category eg. 'FOA-Wireless Access', 'FOA-Web Lectures', 'FOA-Tea Room
Access Code'.
Periodically (maybe every month), the administrator would then export
the 'Admin - Faculty of
Arts' category (using a master password known to users) as a PC-Mac PasswordVault (PV data)
encrypted file and place it on
an internal web server. The data in this file
would always be secure, since it is protected by very strong 896-bit
double-Blowfish encryption. Users could then
download this file and import it into their USB drive copy of PC-Mac
PasswordVault2Go, thereby updating their existing service data and
adding any new services.
When users wish to get information about a service, they would simply
select the 'Admin - Faculty of
Arts' category and all the latest service information from the administrator's
password collection would be accessible.
In smaller organizations or organizations with users in remote
locations, the updated password collection file could be emailed
directly to the user as an email attachment. The data in this file
would always be secure, since it is protected by very strong 896-bit
double-Blowfish encryption. Users could then
import the file into their USB drive copy of PC-Mac
PasswordVault2Go, thereby updating their existing service data and
adding any new services.
Technical
support
Site licensees can designate up to 2 technical support officers per
site to which we will provide technical support. These technical
support officers need to handle all their user's technical support
questions regarding PC-Mac
PasswordVault. We will, under no
circumstances, provide technical support directly to end users
operating under a site licence.
Custom versions
We can build you a customized version of PC-Mac PasswordVault to tailor it to your
organization.
This includes:
- Custom backdrop -
your own unique backdrop can be set as the default. This raises the
profile of your organization to users of the software and allows you to
graphically integrate
the software with your own organizational style.
- Extended desktop
licensing - users in your organization can install the software on
their laptops and home desktop computers (the normal site license only
allows installation of the software on computers owned or operated by
the organization).
- Prelicensing - users
do not need to enter a runtime key during installation. This simplifies
installation and reduces help desk support requirements.
Please email us
at service@lavasoftware.com
for a price quote on a customized version of PC-Mac PasswordVault
for your organization.
Advanced
techniques
Some users like to store their service data on encrypted disk images,
rather than in their operating system preferences folder.
To do this, run PC-Mac PasswordVault
as usual and then export your data to a PC-Mac PasswordVault (PV data)
encrypted file and place it on
the encrypted disk image.
Then quit PC-Mac PasswordVault.
To use this exported file as your main password collection, simply
double-click it and PC-Mac PasswordVault
will launch and use that data for all its operations. If you
subsequently update or add services, the data in this file will be
updated. Your other preferences, such as main window position, master
password, master password recovery system clues, etc. are also stored
in this file. In this way, you can create and use as many unique
password collections as you wish and store them wherever you like.
